A Sixty Second Excel Formatting Hack That Could Literally Save Your Ass
Many years ago, when the workplace was only just SLIGHTLY more paper hungry than today, I almost made an expensive mistake. How expensive? Well, it would have cost me my ass. But I happened to see it coming, and figured out how to avoid it. That hack would stick with me ever since, and save me countless hours of frustration, and loads of embarrassment!
I call it a hack, even though it seems pretty simple. But let me tell you, when I consider how many people I’ve run into who haven’t figured this out, I feel it is worthy of the ‘hack’ designation.
Every month, there is need for lots of number crunching and reviewing and revising and more crunching and so on. Month end close we call it. And at some times of the year, massive amounts of crunching and reviewing and revising is needed almost every day. We call that year end close, and then there is the annual budget cycle. These are super stressful times, for the most part. And in my experience, they are often accompanied by lots and LOTS of printouts and reviews and markups and revision and more printouts.
All those many years ago, I was in the midst of the annual budget cycle mayhem. I had papers all over my desk, multiple iterations of the budget, and marked up copies and more. And suddenly I felt a cold steel ball appear in my stomach. I didn’t know which of the various revisions on my desk was the most recent! What’s more, I needed to revise that one with PART of the updates in the second revision before. GAH!
I sat there for a few minutes, feeling as though a wall of ice water had just come crashing down on me. It was horrible. The consequences of losing track of which was what and where the who was would be horrendous. People were counting on me. I was counting on me!
So, I spent the next hour figuring out which was which, and then I figured something out. I figured out how to prevent this from happening again. And the hack I figured is the same one I use to this day, whenever I setup a spreadsheet of any kind for printing. The details have evolved just a little bit over time. But the base hack that saved my ass has remained valid ever since.
It’s as simple as this, but it needs to become a habit. It needs to become second nature to you, and then you will do it almost without thinking. But you will always be glad you did!
Open an excel file, any file will do for the purposes of this training. Now set a print range. Got it? Good. Next, go to the menu ribbon and select Page Layout. In the bottom right corner of the ‘Page Setup’ section, you will see a tiny little symbol with an arrow pointing down to the right. Click on that and you will get the Page Setup popup window.

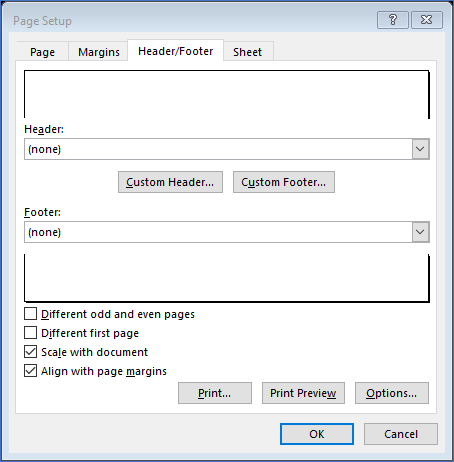
Next, look for the Header/Footer tab in the Page Setup popup window. It will be the third tab from the left. Click into that tab. Here you will see a diagram showing what the header and footer currently look like. We are going to go straight for the Custom Header and then the Custom Footer buttons in the middle of this section. Start by clicking the “Custom Header…” button. You will get another popup window focused specifically on the header.
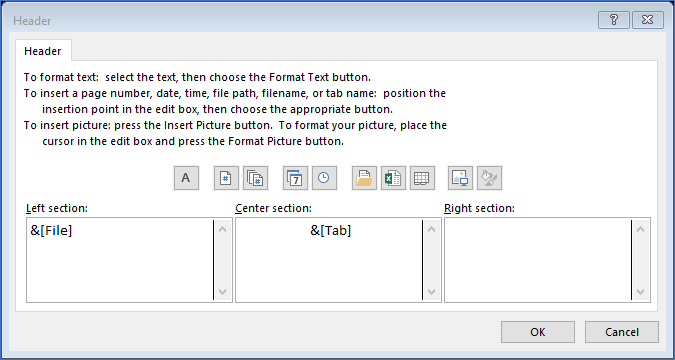
In this area, we first click in the area marked “Left section:”. Then choose the icon in the row above that represents the file name. That is the fourth icon from the right end of the row. Next hit tab once, taking you into the area marked “Center section:”. Now select the icon in the row above that represents the tab within the file. That is the third icon from the right end of the row. We will leave the third section, on the right, empty. Your result should look like the image below. Now click ‘OK’ in the bottom right corner.
Now you will be back in the Page Setup popup window again, and the top section of the window will show a representation of what your page headers are going to look like, based on the selections you just made. Next, click the “Custom Footer…” button. Now you will get a popup window focused specifically on the page footer.
This one is a little bit more detailed, or finicky, than the header… and that much more important. First, click into the area marked “Left section:”, and tap your ‘enter’ key, on your keyboard, once. Now your cursor should be on the next line down in that left footer section. Click on the Path & File icon in the row of icons just above. The icon for Path & File is the fifth from the right end of the row, or the sixth from the left end of the row.
Next, tab into the area marked “Center section:”. Here, we are going to insert the the code so that the page footer will display the page number of the current page, as well as the total number of pages printed. So we’ll use two icons from the row above, with the “/” (forward slash) in between them. First click the page number icon. It is the second one from the left, that looks like a single hashtag on a page of paper. Now click your “/” key on your keyboard. And then click the icon for ‘Pages’ in the row above. The pages icon is the third one from the left. It looks like a stack of pages with a hashtag on the top page.
BUT WAIT… don’t hit tab again yet. Although you won’t see it when you’re done, you have to press the enter key, on your keyboard once before we tab out of this section. This makes sure that the Path & File information will be on the next line down in your page footer. If not, it might print over the page numbers information. So, once you hit enter, and your cursor is blinking on the second, blank, row in this section, you can tab over to the area marked “Right section:”.
Here we are going to insert the code so that the date and time of printing will appear in the page footer. This is the most important part of this whole hack… so pay attention! 😜
First, click the icon in the row above to insert the date. This is the fourth icon from the left end, and looks like a couple of pages with a 7 on the top one. After inserting the date, hit your space bar THREE TIMES. This will put a nice space between the date and the time, making it more readable. After inserting the three spaces, click on the icon in the row above, that looks like a clock. It is the fifth icon in from the left, just next to the date icon.
Again, before you leave this section, you need to press the enter key once. This will put an extra, blank line below the date and time. I’ll explain the reason for it in just a little bit. Now you’re ready to click ok in the bottom right corner. And now you’re done with the custom page footer function!

Let’s take a look at how the Page Setup popup window looks now. You’ve got both your custom page header setup and your custom page footer setup. We want to be sure everything came out right. For starters, the Page Setup window, with the Header/Footer tab selected should look like the image below.
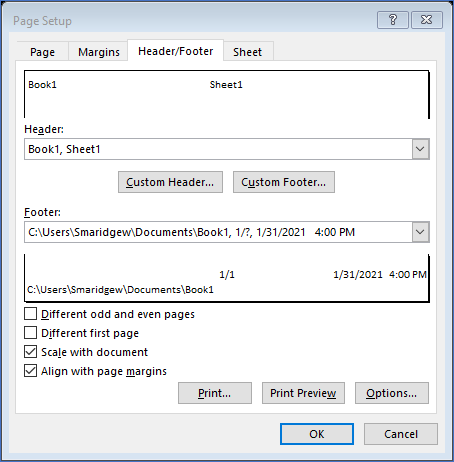
The specifics in each section will vary depending on the particulars of the file you are working in. And notice in the footer preview section, that the Path and File are one row below the pages and date/time. There is good reason for that. If your file name is a little bit long, and if the file is stored in a folder that is several folders deep in your system, the path/name combination will be so long that it would overlap your page numbers, and possibly even your date/time stamp. This way, it will be on the line below, and never overlap the others.
Now, when you print preview the file you’ve been working in, the tops and bottoms of the pages should look like the two images below.


Right about now, if not before, you should be seeing how this hack can literally save your ass. Because when you are up to your eyeballs in budget or financials printouts on your desk, it will only take a second to determine if the one in your hand is the latest version. Add this hack to your next few files, and in no time you’ll make a habit of it, and it will only take you sixty seconds, or less!
Thanks for coming by today fellow Cubicle Farm Survivors! Please let me know what you think of this hack, in the comments below. And always know that I’m rooting for you!! We are all in this together.
Take care, be strong,
Wayne
Recent Comments